
How can I fix Could not create the Java Virtual Machine error?
1. Set up a new system variable for Java
- Open Run with the Windows key + R keyboard shortcut, then enter sysdm.cpl in Run and click OK.
- Select the Advanced tab on that window, and click the Environment Variables button.
- Click the New button under the System variables box.
- Enter _JAVA_OPTIONS in the Variable name text box.
- Then, enter –Xmx512M in the Variable value text box, which increases RAM allocation to 512 megabytes.
- Click the OK button to close the window, then press the OK button on the Environmental window.
2. Select the Run as administrator option for Java
- Press the Windows key + S keyboard shortcut, and enter Java, then right-click Java and select Open file location to open Java’s folder in File Explorer.
- Right-click java.exe and select Properties.
- Select the Compatibility tab.
- Select the Run this program as an administrator option.
- Select the Apply option, and click OK to close the window.
Expert tip:
SPONSORED
Some PC issues are hard to tackle, especially when it comes to corrupted repositories or missing Windows files. If you are having troubles fixing an error, your system may be partially broken. We recommend installing Restoro, a tool that will scan your machine and identify what the fault is.Click here to download and start repairing.
The Java virtual machine error can also be due to insufficient admin rights. Thus, some users might need to assign admin rights to Java.
3. Reinstall Java
- First, open the Run accessory by pressing the Windows key + R.
- Type the command below and hit Enter.
- Select Java from the program list and click Uninstall.
- Click Yes on any confirmation window that opens.
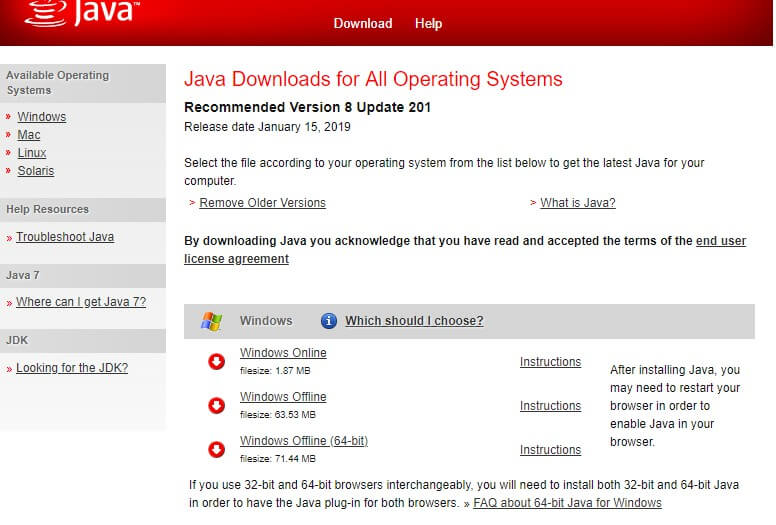
- Thereafter, restart Windows, open the Java download page in a browser, and download either the 32 or 64-bit offline Windows versions.
- Users need 32-bit Java for 32-bit programs and 64-bit Java for 64-bit software. If in doubt, your best bet is to download and install both Java versions.
- Thereafter, open the Java setup wizard, and click the Install button on the setup wizard.
So, that’s how users can fix the Java virtual machine fatal error and get back to running the required Java software.
Any of the previously mentioned solutions may be successfully applied when getting a Java virtual machine launcher error which arises even if nothing has changed on your computer, and it’s most likely related to Java installation.
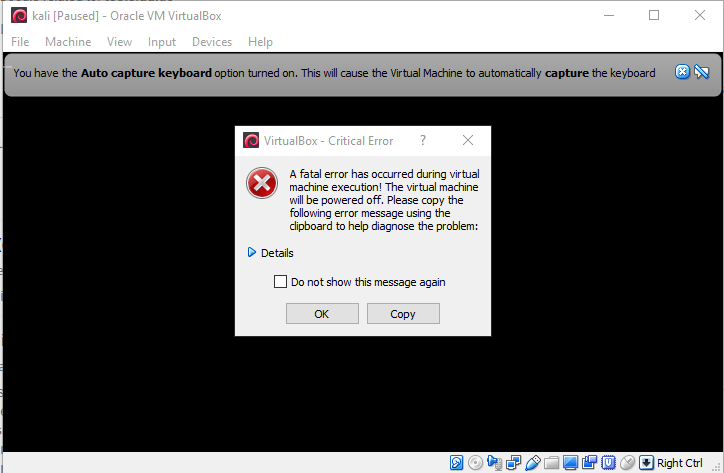
Things are no different when it comes to the Could not create the Java virtual machine a fatal exception has occurred error. This problem also seems to appear randomly. Make sure you aren’t using a 32-bit VM and a 64-bit Eclipse.
Minecraft could not create the Java virtual machine is an error that shows up when trying to launch Minecraft. The main reason is that it needs admin access in order to function properly.
If you have any other questions or if you have advice for other users to try, don’t hesitate to leave a comment below.
Was this page helpful?
4
MyWOT
Trustpilot
Thank you!
Not enough details
Hard to understand
Other
x
Contact an Expert
There are 5 comments
4 Solutions to Solve Java Virtual Machine Launcher Error
Remove Malware on your computer
If the error message is shown is this- “Error Message: Java Virtual Machine Launcher could not find the main class: the program will now exit” then the Microsoft Malicious Software Removal tool, which is an inbuilt utility tool in Microsoft can be used to remove any Malware from your computer.
To access this tool, go to the Search Windows option in your Start menu and type “mrt” and press Enter. In The tool, choose the option for “Full Scan” and follow the on-screen wizard to start the scan. The scan may take a few moments to complete and in the process will also remove all the Spyware, Adware and Malware on your computer. Reboot your computer once the scan is complete.
Now using the System Configuration tool on your computer the rest of the problem. To launch this, you need to type “msconfig” in the Search Windows option that you can find in the Start Menu. In this utility tool, click the “Startup” tab, which opens a long list. Scan the list to find the following- “WJView.exe” and “javaw.exe.” and uncheck these options.
See also: – Failed To Enumerate Objects in the Container
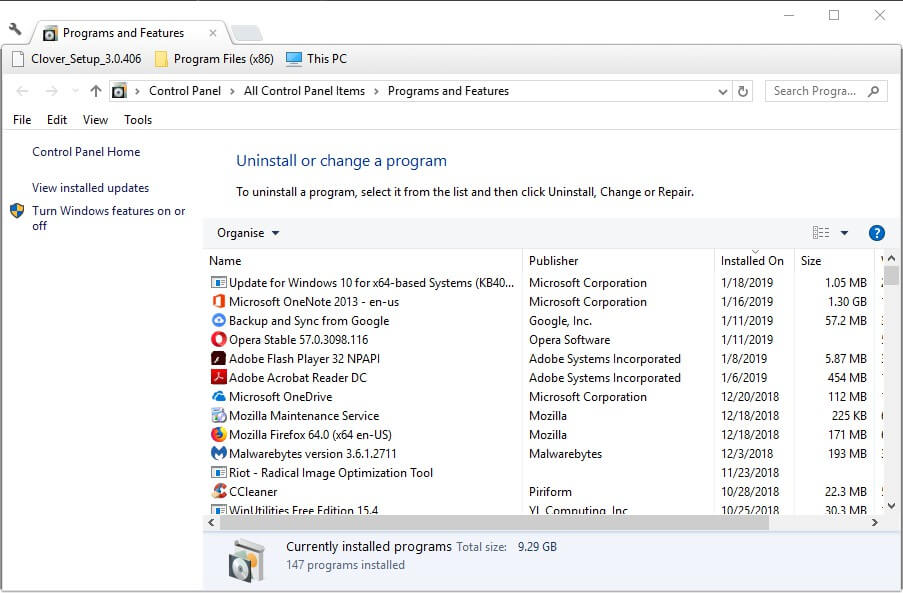
Uninstalling Java and re-installing
As the heading suggests, this solution involves uninstalling the problematic Java Virtual Machine launcher from your computer and then installing it afresh. This is a quite primitive but effective solution to Java Virtual Machine launching problems when the error message shows- “Error Message: Error opening registry key.”
Before uninstallation, open the Windows\system32 and delete the following files- ‘javaws.exe’, ‘java.exe’, ‘javaw.exe’ and any other Java executable file that you can find. For uninstalling JVM, open the ‘Programs and Features’ tab in the Control Panel of your desktop. Scroll down the list to find Java runtime and uninstall it.
For re-installing Java runtime, visit java.com: Java + You and download the most compatible version. Choosing the correct version is very important as an incompatible version of Java Runtime is one of the biggest reasons for the error.
Clearing Computer Memory
One of the most frequent reasons for the Java Virtual Machine launcher problems is insufficient memory in your COMPUTER. This insufficiency may be in your overall computer memory or in the amount of memory you allocate to Java Runtime. To solve the former, just get rid of all those programs that you don’t use, and you will have a clutter-free (and hopefully a problem-less) computer.
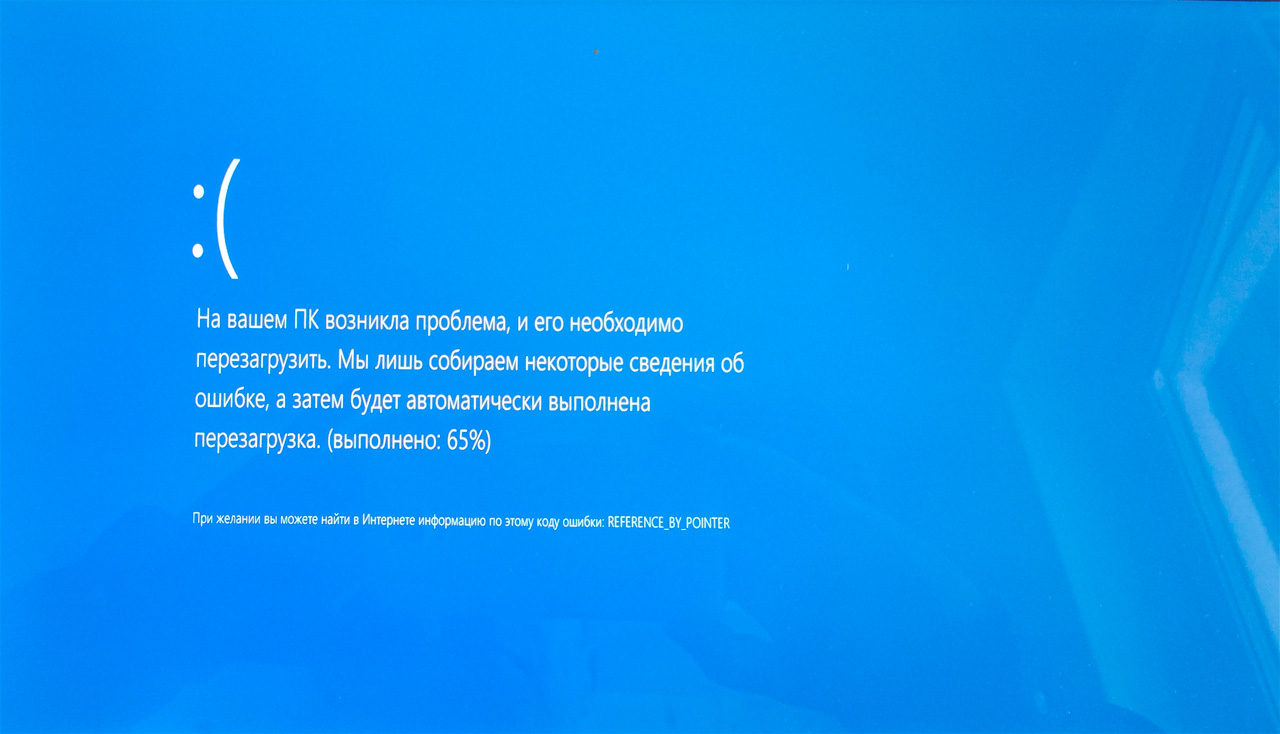
When Java has allocates insufficient memory space, then the error that comes is- “Error Message: Could not create the Java Virtual Machine.” This is one of the most common Java Virtual Machine Launcher errors that you encounter during playing games on Java like Minecraft.
To solve the memory space allocated to Java, go to the Systems options in Control Panel and open the Advanced options window. Here, clicking on the Environment Variables option, you will find a ‘System Variables’ option. Click on the ‘New’ variable option and put the name of the variable as ‘_JAVA_OPTIONS’ with a value of ‘Xmx512M’. (Xmx refers to the maximum space and Xms refer to the minimum space that you can allocate to Java)
See also: – Top 4 Best Virtual Machine Applications for Windows 10 – TechWhoop
Miscellaneous Fix
This solution is for the Java Virtual Machine Launcher error prompt- “Error Message: Unable to access jarfile.” Which comes when trying to open some java based applications. Start by opening the ‘Default Programs’ tab from the Start Menu. Scan the list to find an option called- ‘Associate a file type or protocol with a program’ and select it.
There will be an extension ‘.jar’- Click on this and change the default program to ‘JAVA virtual machine launcher’. Clicking on ‘Close’ will save the changes. Try reopening the program that was earlier causing the problem.
How to Fix the JVM Launcher Error: “Could Not Create Java Virtual Machine”
Below are 3 potential causes for the JVM launcher error and how to fix them. I’ll start with the first thing you should check when attempting to fix this error.
1. Ensure You Have Installed Java Correctly
Before you attempt any other fixes, you should know that a faulty Java installation can be the culprit. That’s why you should immediately think to check this. To ensure you’ve installed Java correctly, follow these quick steps:
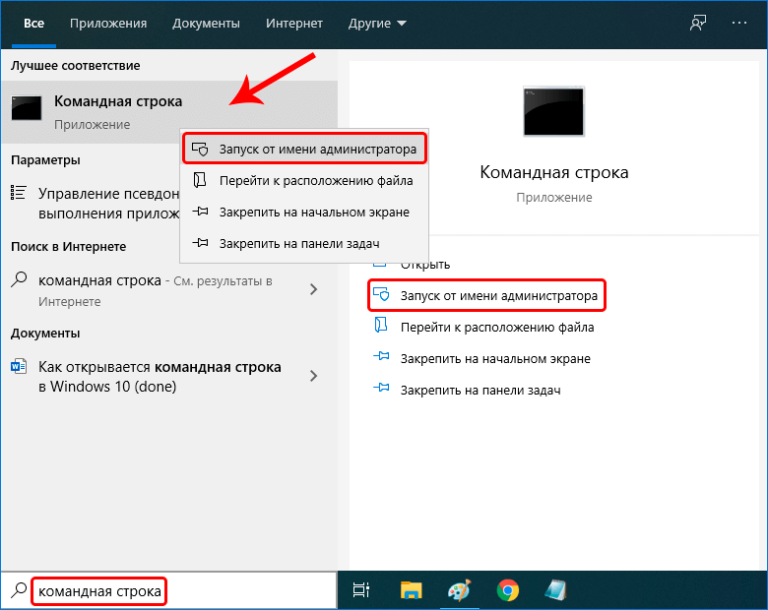
- Open the command prompt by typing ‘cmd’ in the start menu
- Select Command Prompt app
- Type Java-version in the command prompt window and press Enter
- Look for the version of Java, the SE runtime environment, and the client VM Build version. If you installed Java correctly, you should see those
![]() Installing Java properly is key!
Installing Java properly is key!
Now, if the error persists even with a clean install, you should see if Java has the proper permissions on your machine.
2. Run the Program as an Administrator
Often, this specific JVM launcher error happens due to a lack of permissions. If you haven’t enabled Java to access admin privileges or to run as an administrator, the JVM can’t launch. These permission-related errors can also happen in personal computers and enterprise systems. Thankfully, you can still run Java as an administrator. Simply follow these steps:
![[solved] how to fix java virtual machine launcher error](https://tiniatov.ru/wp-content/uploads/6/9/8/69835b62cf382bba11cba2a2b74b54ea.png)
- Press Windows key + Q to access Windows search on your Windows machine
- Type Java into the search box
- Right-click it to open its file location
- Locate the Java Executable file in the folder
- Right-click it to select Properties
- Switch to the compatibility tab
- Enable the Run the Program as an Administrator option under the Settings section
- Click Apply and save the settings
![]() Make sure that you enable Java to run as administrator!
Make sure that you enable Java to run as administrator!
Now, Java should have all the permissions it needs to run your application. You can also try restarting and loading the application to see if this fixed the issue. If it hasn’t, chances are your Java also needs more memory allocated. Check out how to remedy this.
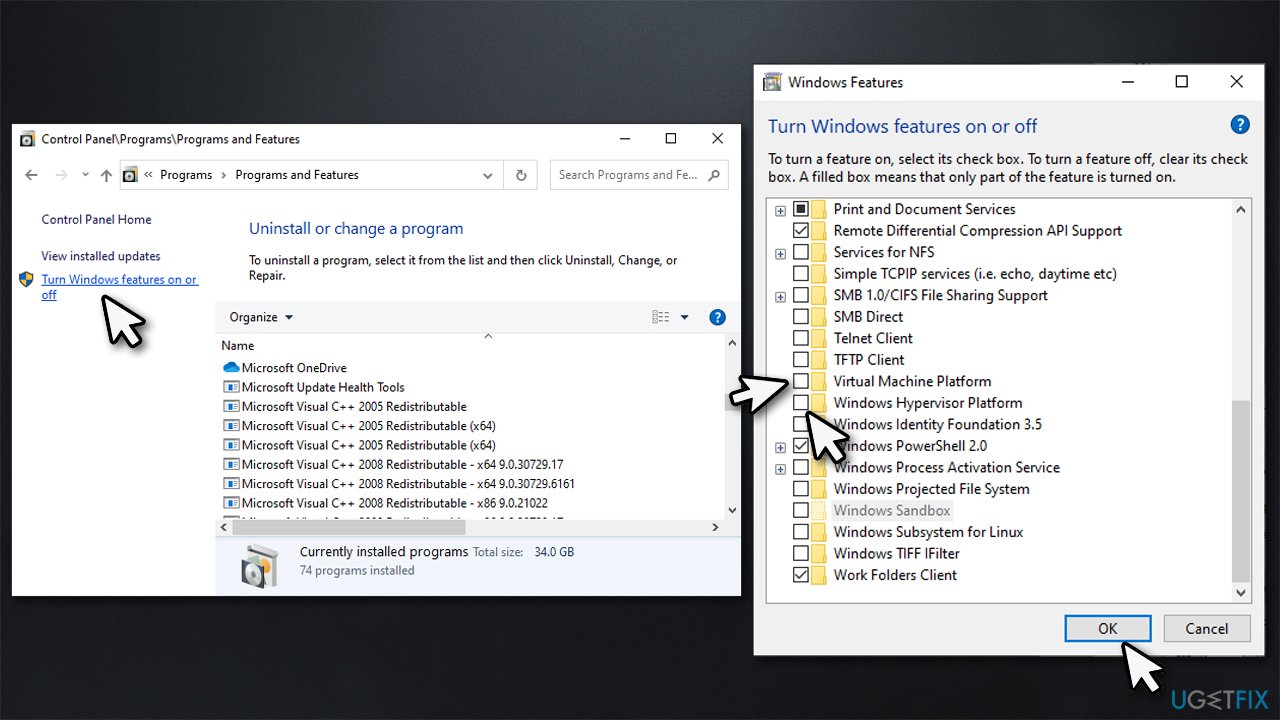
3. Add a New Java System Variable
If none of the above solutions worked for you, you likely need to add a new Java system variable. You can also try to expand the available system (RAM) memory allocation for Java.
To do that, follow these steps:
- Go to the start menu
- Type environment
- Select the Edit the System Environment Variables option within the control panel
- Choose Environment Variables in the System Property window
- Select New under System Variables
- Set the Variable name as _JAVA_OPTIONS
- Set the Variable value as -Xmx512M
![]() Select the “Edit System Environment Variables” option in the control panel!
Select the “Edit System Environment Variables” option in the control panel!
Just like that, you’ve set the allowable system memory for Java to 512 MB. This should hopefully fix the issue.
If the new allowable system memory isn’t enough, repeat these steps. Only this time, set the variable value to -Xmx1024M. This will increase the memory allocation to 1024 MB.
![]() Add a new System Variable to increase the memory allocation!
Add a new System Variable to increase the memory allocation!
Reasons for occurring the Could not create the Java Virtual Machine error:
The reason for this problem on Windows 11/10 can be traced to a variety of factors. It is possible that the incorrect settings are being used to invoke a Java program that you are executing on your homebrew platform. Conversely, if indeed the heap storage capacity is more than the amount of the System Variable, then the Java program you are attempting to open may unable to start.
A large number of people have reported facing the same problem. When opening a program, you will see the message “Could not create the Java virtual machine.” Try and make a change by making a new Java systems variable and seeing whether that makes any effect. It is also recommended that you run the application as an administrator, as such a restriction of permissions may result in the issue. If you’re already having trouble, the only way to fix this would be to reinstall this program from the beginning.
Restore PC Repair Tool is recommended for the resolution of a wide range of PC issues:
Using this program, you can fix common computer faults, secure your system from file damage and infection, prevent equipment failure, as well as optimize your machine for high results. In only three simple steps, you can resolve PC difficulties and eradicate viruses:
- Download the Restore PC Repair Tool, which includes Patented Technologies.
- Start scanning to look for Windows faults that may be causing your computer to malfunction.
- To resolve issues that are harming the security and reliability of your desktop, select Repair All.
If some people tried to install software that is created just on the Java platform, they receive the Java virtual machine deadly failure error. Minecraft players aren’t unfamiliar with this problem.
In its entirety, the warning message reads: “Could not create the Java Virtual Machine.” An error has happened as a result of a severe exception.
As a result, the Javascript is unable to execute. Some potential solutions for such Java Virtual Machine hard crashes are shown below.
Fixing Java Virtual Machine Error in Windows
You can somewhat diagnose what is wrong with your JVM and attempt a corresponding fix based upon the type of error message that you see when you JVM does not work.
Reinstall/Update Java
If the error message you see is Java Virtual Machine Launcher Could Not Find The Main Class, then Java has been incorrectly installed or Java installation has been corrupted in your machine.
JNI errors can be caused by outdated version of Java.
To fix this, you need to reinstall Java Runtime Environment.
Windows 10
- Launch Settings (Press Win + I), then navigate to Apps.
- Scroll to find Java and select Uninstall.
- Download and install the .
- Restart your computer.
Windows 11
- Launch Settings, navigate to Apps > Apps & features.
- Scroll to find Java.
- Click on the kebab button to its right, then select Uninstall.
- Download and install the latest version of Java.
- Restart the computer.
Increase System Memory for Java
You will get a Could not create the Java virtual machine error if Java is trying to use more memory than has been assigned to it.
You can fix this by increasing the amount of memory allotted to Java.
- Press Win + R and type l to launch the Control Panel.
- Navigate to System > Advanced System Properties.
- Click on Environmental Variables, then click New… under System variables.
- On the box next to Variable name, type in .
- On the box next to Variable value, type in .
Note: The variable value -Xmx512M sets memory available to Java to 512 MB. You can change this value depending upon how much memory your Java was utilizing before. For instance, setting this to -Xmx1024M assigns 1024 MB system memory to Java.
Run as Administrator
Sometimes JVM errors can occur because you do not have sufficient user privilege to run the application.
You can fix this by configuring Java to run as administrator.
- Press Win + E to launch Windows Explorer, then navigate to Java installation folder. (Usually located at )
- Find and right-click on it.
- Select Properties.
- Switch to Compatibility tab and put a tick mark on Run this program as an administrator.
- Click Apply, then click OK.
Set File Type Association to Java
If your error message is Unable to access Jar file, then one of the reasons for this issue is that your jar file association is not set to Java.
Windows 10
- Launch Settings (Press Win + I)
- Navigate to Apps > Default apps.
- Click on Default apps by file type.
- Scroll to find from the list of file types.
- Click on the currently set default application next to it.
- Click on Java(TM) Platform SE binary.
- Close Default apps setting.
Windows 11
- Press Win + I to launch Settings.
- Navigate to Apps > Default apps.
- Enter file type in the box under Set a default for a file type of link type.
- Click on the application that is currently selected to open .jar files, then click on Java under Other options.
- Close settings.
Java не является внутренней или внешней командой
Ошибка с текстом «Java не является внутренней или внешней командой» также возникает у геймеров. Сложно сказать, что ее провоцирует, но исправить это легко:
- Определите место установки модуля. Искать можно как JRE, так и JDK (с предустановленным Javac). На Windows 7 и 10 папка Джава расположена по пути C:\Program Files.
- Найдите папку Bin, скопируйте путь до нее целиком. Он может оставаться в буфере обмена, пока выполняются следующие пункты.
- Перейдите в переменные среды (способ описан выше).
- В списке «Системных переменных» есть пункт Path. Сделайте по нему одиночный клик, нажмите «Изменить».
- Рекомендуется сохранить исходную строку, но не стоит забывать, что в буфере обмена находится путь до папки Bin.
- В самый конец строки добавляется путь из буфера. Предварительно поставьте точку с запятой.
- Чтобы сохранить свежую версию переменной, выйдите из настройки и нажмите OK.
https://youtube.com/watch?v=xX3ZLX9ESDo
Видео: Исправление ошибки «Java не является внутренней или внешней командой» на Windows 7.
Способ 2. Освобождаем оперативную память ПК
Следующий метод устранения ошибки заключается в освобождении оперативной памяти вашего компьютера. Как уже было сказано, ошибка может возникать по причине недостатка памяти. Чтобы ее освободить, нужно закрыть все ненужные программы, а также «убить» все лишние процессы. Ведь каждая программа нуждается в определенном количестве этого ресурса. На официальном сайте Майкрософт вы можете ознакомиться со всеми важными процессами Windows, прекращение которых повлечет за собой сбои системы. Чтобы остановить лишние процессы:


![[solved] how to fix java virtual machine launcher error](https://tiniatov.ru/wp-content/uploads/b/a/2/ba218a6052391e3d1303eb0037196f4a.jpeg)
![How to fix java virtual machine launcher error [simple guide]](https://tiniatov.ru/wp-content/uploads/5/6/0/56000a2adcb0f38a8186f193de737c0c.jpeg)
-
- Нажмите сочетание клавиш CTRL+SHIFT+ESC для Windows 7,8,10. CTRL+ALT+DEL – для Windows XP.
- Откроется окно со списком запущенных программ и процессов на вашем ПК.
Чтобы закрыть программу или остановить процесс, нужно выделить мышью название программы или процесса, затем нажать на кнопку внизу окна «Снять задачу».
Некоторые запущенные фоновые программы не отображаются в списке, но их можно увидеть в списке процессов. Эта разнообразные модули обновлений, они работают в фоновом режиме и следят за выходом новых версий определенных программ. Они также потребляют оперативную память. Вашей задачей будет отыскать такие процессы и остановить для решения текущей проблемы. Когда вы очистите память и остановите все ненужные программы и процессы, попробуйте запустить снова игру, чтобы убедиться, что окно с ошибкой «Could not create the Java Virtual Machine» уже не появляется.
Прекращена работа программы Java(TM) Platform SE binary
- Появление ошибки после первого запуска приложения свидетельствует о возможном отсутствии модуля Джава на ПК. Даже если есть какие-то следы ПО, то их лучше удалить и скачать плагин заново.
- Если Джава установлена на компьютере, сравните ее разрядность с аналогичным параметром операционной системы. Для этого найдите плагин в панели управления. Название, не содержащее цифр, говорит о версии x64, в противном случае установлена x32.
После исключения отсутствия модуля или несовместимости остается только один источник проблемы – видеокарта. Выполните следующие действия:
- Создайте новую переменную среды. О том, как это сделать, рассказано выше. Напишите следующие параметры: имя – _JAVA_OPTIONS, значение – -Xmx256M.
- Сохраните переменную, перейдите к настройкам в игре.
- Отключите следующие параметры: VSync, VBos, Smooth Lighting.
- FOV должно иметь значение Normal.
Для закрепления результата обновите драйвера для видеокарты и перезагрузите компьютер.
![]()
Ошибка Out of Memory в Minecraft — У некоторого числа пользователей она возникает. Сегодня, мы попытаемся рассказать как это исправить, можете не думать что это трудно, каждый сможет проделать всё что написано в данной новости.
Причины: Недостаточное количество свободной оперативной памяти для игры.
Решение: Закройте все те программы, которыми вы в данный момент не пользуетесь. Далее попробуйте запустить Minecraft, если не помогает:
1) Идем в панель управления, находим надпись Java.2) Входим в управление Джавой нажав на название.3) Затем нажимаем кнопку View. Дважды кликаем на поле Runtime Parameters.4) Вводим туда -Xms256m -Xmx1024m или более.Xms — начальное выделение оперативной памяти, Xmx – максимальное. Выставлять Xmx стоит равным 3/4 от размера своей оперативки. Пример: если у вас 1Гб оперативки, выставляем -Xmx768M.5) Применяем все изменения.6) Перезагружаем компьютер.
![]()
Не правильно вышли из Майнкрафт, из-за чего Java начал вести себя не корректно.
1 Способ: Заходим в папку с игрой, создаём текстовый документ с таким содержанием: «java -Xms650m -jar «c:\Users\USERNAME\AppData\Roaming\.minecraft\minecraft.exe» и сохраняем под таким названием — «minecraft.bat»USERNAME — Заменить на своего юзера.
Запускаем игру через minecraft.bat.
2 Способ: Заходим в «Мой компьютер», ищем там кнопку «Свойства системы», нажимаем. В открывшемся окне, нажимаем на «Дополнительные параметры системы». ![]()
В новом окне, нажимаем на «Переменные среды». ![]()
В очередном окне, нажимаем на кнопку создать, и вписываем параметры со скрина: ![]()
Готово, думаю многие теперь исправят данную проблему!
Вновь поднимаю тему так как столкнулся с той же проблемой, и дело не в пиратском майне, мне java нужна сама по себе, т. к. недавно занялся её изучением, хотя ошибка возникла всё же по вине майна, пытался устранить ошибку «Out of Memory». Прилагаю инструкцию по которой действовал:
- Жмём правой кнопкой мыши по «Мой компьютер» и выбираем «Свойства»
- Выбираем вкладку «Дополнительно»
- Нажимаем «Переменные среды»
- В верху жмём «Создать»
- Имя: _JAVA_OPTIONS
- В значение вбиваем нужные вам параметры. Например, -Xincgc -Xmx2G .
После выполнения всех этих действий, при попытке запуска майна возникла ошибка, переустановка явы не помогла.
P.S. Одним из решений этой проблемы, думаю, является переустановка винды, но хотелось бы обойтись без этого.
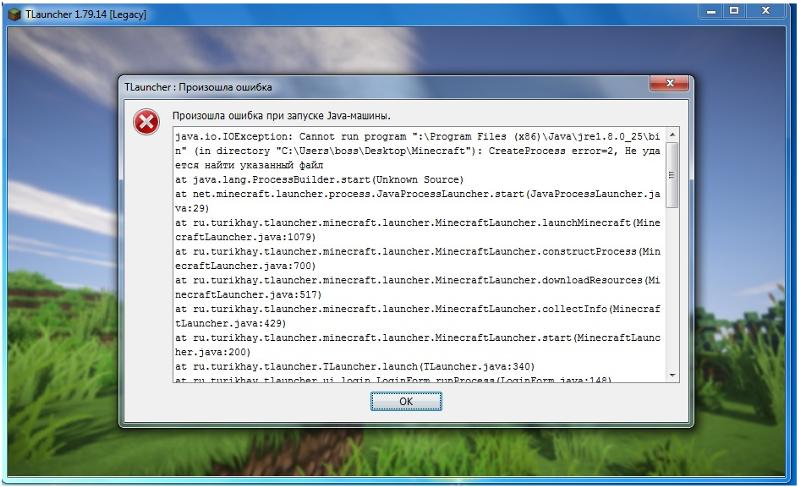
Minecraft, «Java, could not create the java virtual machine»Обычна проблема — «Java, could not create the java virtual machine», всё что можно было найти в.
Minecraft «Java, could not create the java virtual machine» !Всё что можно было найти в Google или Яндексе я пробовал. Компьютер: Core i5, 4 Гб оперативки.
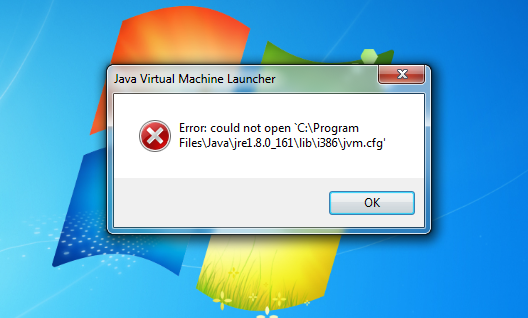
Ошибка при установке Java: «Could not create the Java Virtual Machine»НЕ могу установить джаву при конце установке вылетает ошибка Could not create the Java Virtual.
Не могу установить Java Virtual MachineПрошу помощи, нужен компилятор SDK, установил, прочитал чтобы проверить его работоспособность.
The Bottom Line
JVM launcher errors are very common in several systems executing Java applications. However, with the right approach, it is easy to fix the “Could not create the Java Virtual Machine” error.
In this post, I detailed what a Java Virtual Machine is. I also discussed three crucial solutions to fix this error, like clean installing Java, running it with administrator privilege, and allocating more system space for Java.
Once you manage to overcome the JVM launcher error, you should be able to write, execute, or load any Java applications on your PC. Let me know if this helped you fix the error in the comments section below!
Do you have more questions about JVM errors? Check out the FAQs and Resources section below!
Get The Latest Tech News
What Is a Java Virtual Machine Error?
JVM launcher errors usually occur when you’re trying to launch an application built on or around Java. It may also happen if your application has a dependency on any Java library or package. Unfortunately, many factors can cause different JVM errors, but in this post, I’ll show you the most common JVM launcher error: “Could not create the Java Virtual Machine”.


![]() Read on to find out how to avoid this message!
Read on to find out how to avoid this message!
This JVM launcher error typically means that your computer can’t read or understand the source code you’re trying to execute. This error will also prevent you from opening your Java-based software.
Don’t worry. A JVM launcher error isn’t nasty in itself, it’s just inconvenient. That’s why it’s also important to understand why it happens, so you can fix it. In this next section, I’ll show you some different reasons for the JVM launcher error. I’ll also show you potential easy fixes for it!
Как исправить ошибку Java в Майнкрафт
Стоит отметить, что проблема с уведомлением о сбое «Прекращена работа программы Java(TM) Platform SE binary», появляется не только в Minecraft, поэтому мы собрали как советы по решению сбоя в игре, так и в других приложениях.
Видеокарта
Чаще всего проблема возникает из-за графического движка в игре. Поэтому вот несколько советов по настройкам:
Дополнительные советы по настройкам видеокарты:
- Обновите драйвера на вашем ПК. Конкретно вам нужны драйвера видеокарты. Это можно сделать через системную опцию, либо применить тот же Driver Pack Solution.
- Ошибка возможна из-за конфликта со встроенной видеокартой. Для этого её следует отключить и перезагрузить ПК. Вот пояснения на видео.
- После того, как вы нажимаете «Закрыть программу», появляется MineCraft Launcher. Внизу этого лаунчера есть кнопка New Profile (Новый профиль) — кликайте по нему. Пропишите новое имя (Profile Name), а ниже, в Java Settings, проверьте путь к исполняемому файлу. Если в конце указано javaw.exe, тогда удалите букву W. Сохраните профиль и пробуйте запуститься.
- Переустановите моды и дополнительные расширения к игре. Часто они являются источником проблемы.
- Отключите экраны антивируса на время загрузки и пробуйте запуститься.
- Переустановите Майнкрафт.
Дополнительные методы устранения ошибки
Если программное обеспечение, при запуске которого появляется ошибка, было скачано со сторонних ресурсов, варезных сайтов, торрент-трекеров, то его действия часто блокируют антивирусы. Чтобы избежать такой преграды при запуске вам необходимо проверить список карантина антивируса и, если в нем имеются игры или программы, вы можете их удалить с этого списка. Но будьте осторожны при этом. Ведь такое ПО может действительно нести угрозу для системы. Если вы полностью уверенны в программе или игре, вы можете добавить ее в список исключений. В таком случае антивирус перестанет «подозревать» такое ПО.
![]()
После этого будет загружен пакет данных, который нужно будет установить на свой ПК.
Источник
FAQs
What is JVM?
(JVM) is a piece of code that enables a computer to run and execute any Java application. A JVM also makes Java platform-independent. Any OS or machine with a JVM can run and execute Java code. When doing that, you can face a JVM launcher error, ranging from simple permission issues to complex system memory allocation errors.
What is the importance of a JVM?
JVM plays a very vital role in making Java a platform and OS independent language. JVM converts the Java byte code into machine language. Because JVM is crucial to execute any Java application, it can also lead to several JVM launcher errors that could act as a roadblock in loading Java applications.
What are some of the other JVM launcher errors?
Other JVM launcher errors include:
- Error opening registry key
- JVM launcher could not find the main class: the program will now exit
These errors should also have fixes that allow you to re-launch your Java application.
What are some benefits of Java?
Java is a secure high-level object-oriented programming language that provides numerous benefits. For example, it offers automatic garbage collection. It can also serve the development of a wide range of applications. Java is also more stable than other languages, and it’s platform-independent.