
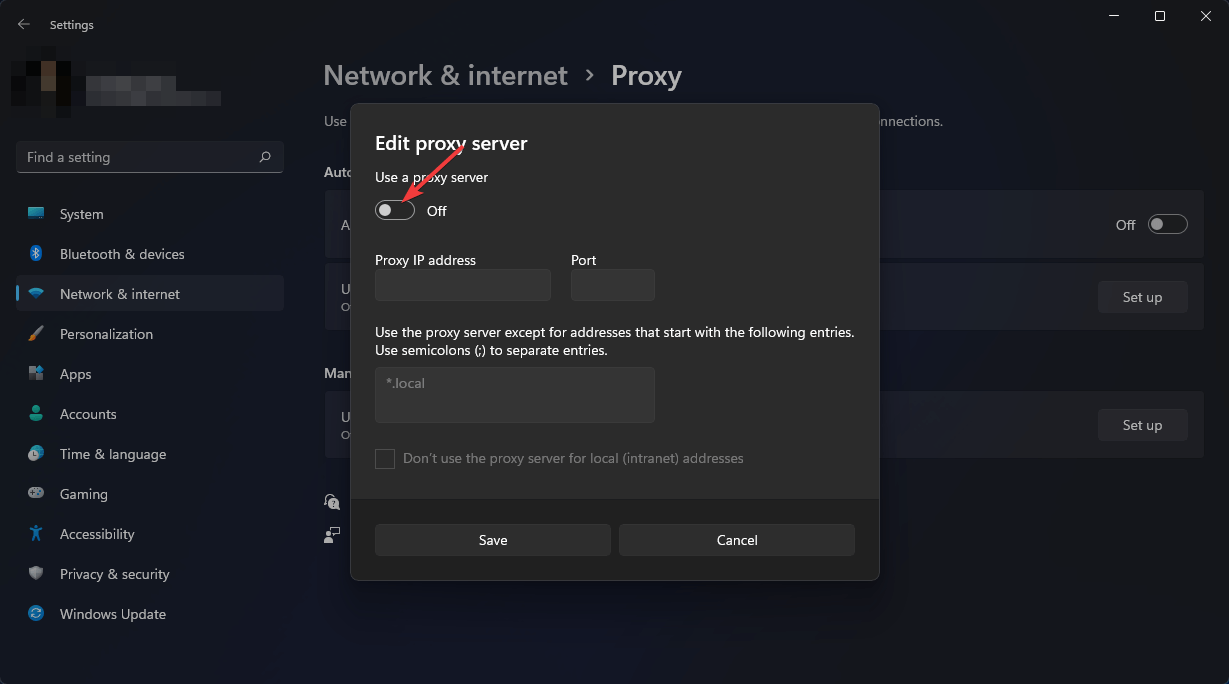
Ошибка загрузки и её исправление
Бывает так, что вы запустили скачанный torrent-файл, началась успешная загрузка, но вдруг клиент выделяет строку закачки красным и выдаёт ошибку «Не смонтирован предыдущий том». В английской версии приложений torrent она выглядит как Volume not Mounted error. Остановка и перезапуск торрента ни к чему не приводят.
ВНИМАНИЕ. Том — это, другими словами, логический диск
Существует физический носитель, винчестер, либо внешний жёсткий диск. А он уже может быть разделён на несколько разделов. Такой раздел и называют том. То есть Torrent не может найти место, в которое начал сохранять контент.
Ошибка «Не смонтирован предыдущий том» может возникнуть по следующим причинам:
- В качестве места загрузки вы выбрали съёмный диск. А потом его вытащили. И даже если вы опять подключили, но уже в другой USB-порт, то система назначила ему другую букву, что и вызвало ошибку торрента.
- Вы поменяли букву раздела винчестера, то есть сменили название места назначения, и torrent-клиент больше не видит пути, по которому нужно сохранять содержимое.
В соответствии с описанными причинами, исправить ошибку «Не смонтирован предшествующий том» в uTorrent можно следующим образом:
Если вы начали загрузку на флешку или съёмный диск и потом их вытащили из компьютера, поставьте на место в тот же USB-порт. Затем в uTorrent запустите загрузку заново (нажмите «плей»). Если вы не помните, в какой порт вставляли съёмный носитель, и предыдущий пункт не дал результата, то:
- Зайдите в программу.
- Поставьте загрузки на паузу.
- Щёлкните правой кнопкой мыши по загрузке, выдающей ошибку, и вызовите контекстное меню.
- Выберите пункт «Дополнительно», «Загрузить в».
- Укажите путь для закачки.
- Запустите закачку.
Определите новое место назначения. Лучше выберите папку на винчестере и сохраните файлы туда. А после уже перенесёте на съёмный носитель. Так вы гарантируете себе, что ошибка «Не смонтирован предшествующий том» больше не повторится.
СОВЕТ. Если вы скачивали не на съёмный носитель, но поменяли том на жёстком диске, то либо верните ему прежнее название через специальную программу, либо, что проще и не приведёт к потере данных, воспользуйтесь вторым пунктом этой инструкции.
Помните, что если вы меняете место загрузки (второй пункт инструкции), то всё содержимое файла torrent будет закачиваться заново. Если же у вас получится продолжить (то есть первый пункт), то просто будут докачаны недостающие части.
Таким образом, можно исправить ошибку в uTorrent «Не смонтирован предшествующий том» двумя способами в зависимости от вызвавшей её причины. Рекомендуется в настройках uTorrent прописать путь сохранения по умолчанию на жёсткий диск либо запрос места сохранения при открытии нового торрента. Выбирайте папки на внутреннем диске, чтобы избежать ошибок.
Решение проблем с установкой uTorrent в Windows 7
Данный вариант не часто оказывается эффективным, однако так можно исключить первую причину проблем с установкой, вызванной поврежденным инсталлятором или появившейся из-за устаревшей версии uTorrent. Советуем воспользоваться ссылкой ниже, чтобы перейти к официальному сайту программы и скачать оттуда последнюю стабильную сборку для последующих попыток ее установки.
Там же ниже находится и бета-версия для всех тех, кто предпочитает получать доступ к новым функциям раньше других. Она может оказаться рабочей в тех случаях, когда стабильная не захочет инсталлироваться даже после произведения всех описанных ниже манипуляций.
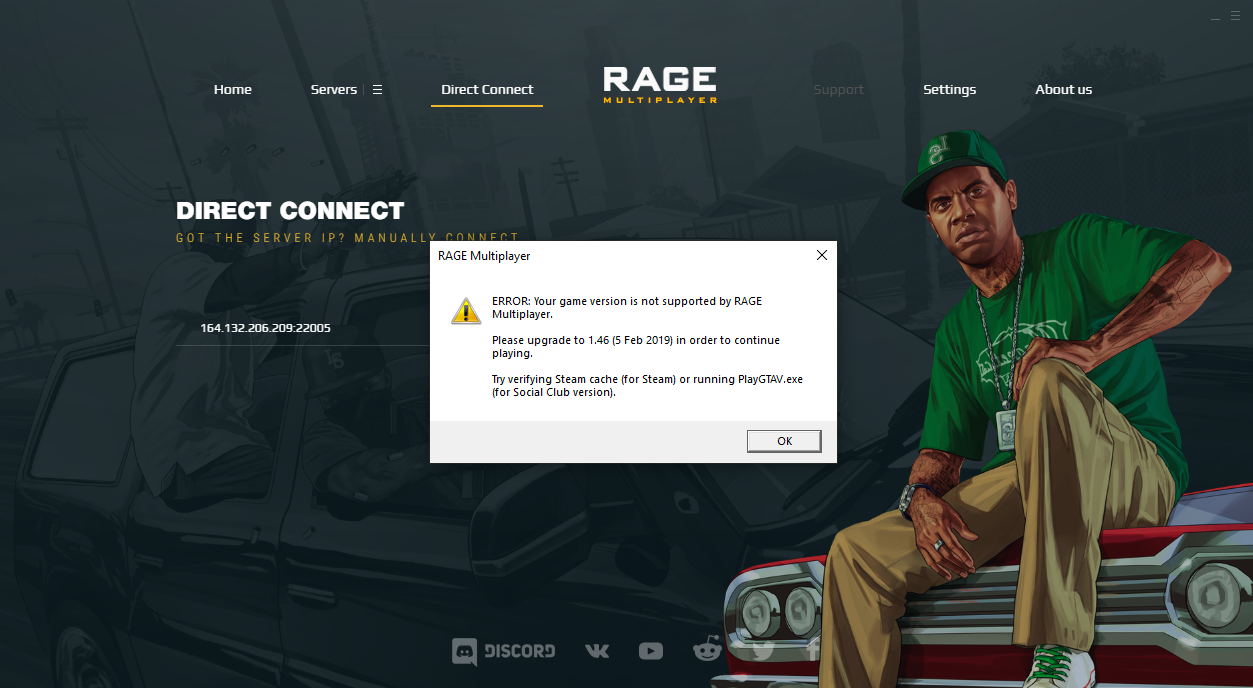
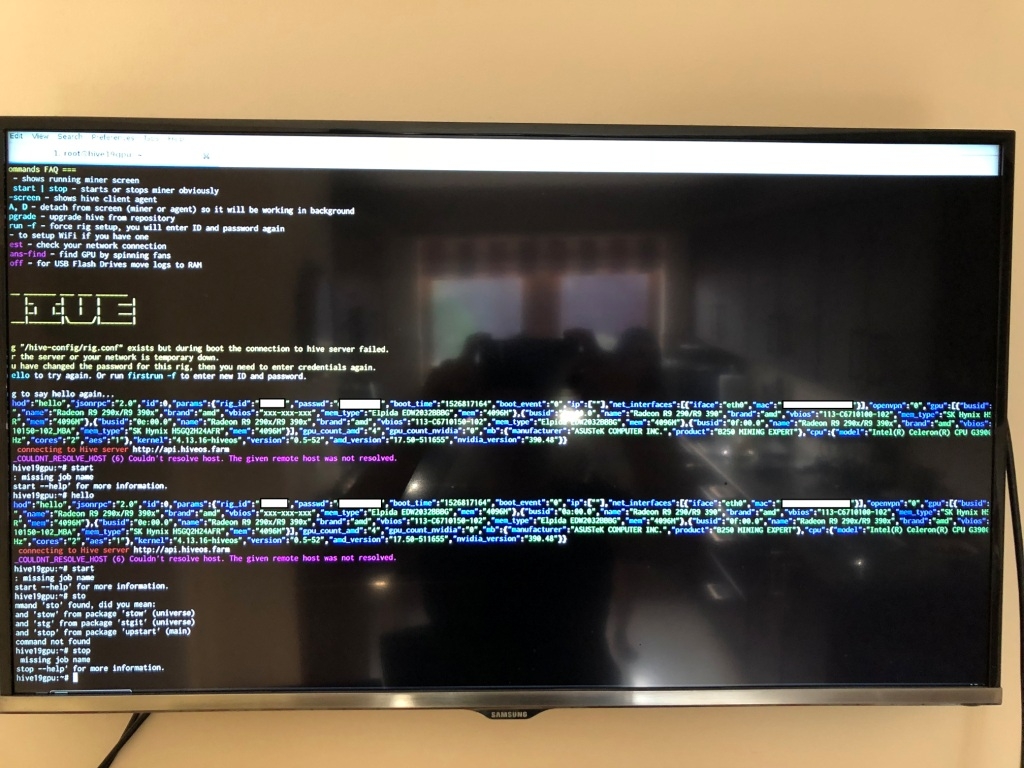
10.15 «Network error: Software caused connection abort»
This is a generic error produced by the Windows network code when it kills an established connection for some reason. For example, it might happen if you pull the network cable out of the back of an Ethernet-connected computer, or if Windows has any other similar reason to believe the entire network has become unreachable.
Windows also generates this error if it has given up on the machine at the other end of the connection ever responding to it. If the network between your client and server goes down and your client then tries to send some data, Windows will make several attempts to send the data and will then give up and kill the connection. In particular, this can occur even if you didn’t type anything, if you are using SSH-2 and PuTTY attempts a key re-exchange. (See for more about key re-exchange.)
(It can also occur if you are using keepalives in your connection. Other people have reported that keepalives fix this error for them. See for a discussion of the pros and cons of keepalives.)
We are not aware of any reason why this error might occur that would represent a bug in PuTTY. The problem is between you, your Windows system, your network and the remote system.
Способ №3. Visual C++
О распространяемом пакете Visual C++ в контексте рассматриваемой проблемы можно скачать то же самое, что и о библиотеках DirectX.
Возможно, какие-то файлы были повреждены или версия устарела.
Бывают в данном случае и другие ситуации, когда установленная C++ попросту не подходит для вашей операционной системы.
Ниже приведена таблица с вариантами, которые подходят для разных версий ОС.
| Операционная система | Требуемая Visual C++ |
|---|---|
| Windows XP и ниже | C++2008 |
| Windows 7 | C++2010 |
| Windows 8 и 10 | Наиболее актуальная на данный момент |
Так вот, в зависимости от того, какая у вас ОС, вам следует скачать и инсталировать на свой компьютер C++2008 (64-бит, 32-бит), C++2010 (64-бит, 32-бит) или же C++2015 обновление 3.
Это наиболее актуальная версия по состоянию на июнь 2017 года. В будущем выйдут новые, поэтому следите за новостями на официальном сайте Microsoft.
Скачивание происходит одинаково – выбираем язык распространяемого компонента и жмем кнопку «Скачать». После этого останется запустить загруженный файл.
После этого перезагрузите компьютер.
Страница загрузки Visual C++
Replies (8)
Thank you for your interest in Windows 10.
If you become disconnected from your installation point or network resource, reconnect and try to install the client again.
In this case, I would suggest you to disable (preferably uninstall) any security software installed in the system and then try installing the security software in compatibility mode.
Check with the issue. Please post back your results for further assistance.
Was this reply helpful?
Sorry this didn’t help.
Great! Thanks for your feedback.
How satisfied are you with this reply?
Thanks for your feedback, it helps us improve the site.
How satisfied are you with this reply?
Thanks for your feedback.
I tried but the purposed solution did work. I ran the installation file in compatibility mode for previous windows version and still got the error message.
«The older version of Cisco AnyConnect Secure Mobility Client cannot be removed.»
2 people found this reply helpful
Was this reply helpful?
Sorry this didn’t help.
Great! Thanks for your feedback.
How satisfied are you with this reply?
Thanks for your feedback, it helps us improve the site.
How satisfied are you with this reply?
Thanks for your feedback.
msiexec /fv anyconnect-win-4.1.04011-pre-deploy-k9.msi /lvx «c:\Temp\ac-Uninstall.log.txt”
Again the installations failed. This time with te message: The file «ManifestTool.exe» is not marked for installation.

![Самые легкие способы исправить ошибку [runtime error]](https://tiniatov.ru/wp-content/uploads/9/1/0/91036f3cd525ac533296a31f44f93ded.png)

Only option I had was to click on «Ok».
This time the log «c:\Temp\ac-Uninstall.log.txt” was created. In this log I found this line:
I searched on the internet for «error 2753» AND «is not marked for installation». I found this site that directed me to the solution:
In the registry I found the key that was causing the installation failure. I deleted the key in the following steps and after that I succesfully installed the new client.
To edit the registry, do the following:
1.Click Start and type regedit in the box.
2.A dialogue box will pop up with the following text: Do you want to allow the following program to make changes to this computer? Click Yes.
3.Browse to the following location: HKEY_CLASSES_ROOT\Installer\Products\
4.Within the Products folder, locate and delete the registry key which contains product information for Cisco AnyConnect Secure Mobility Client.
◦Each registry key within Products is an alphanumeric string. Select the first key and look on the right side for ProductName REG_SZ Cisco AnyConnect Secure Mobility Client. Go through each key in the Products folder until you find the one for Cisco AnyConnect Secure Mobility Client.
◦In my (this) case:
◦Your version of Cisco AnyConnect Secure Mobility Client might have a different name for this registry key.
◦I recommend making a backup of this registry key before deleting it.
5.Close the registry editor.
After this start the installation of the new Cisco AnyConnect Secure Mobility Client.
Christopher and Pete from Cisco support: thanks for your help in solving this problem and pointing me in the right direction!
EPERM
The error may be encountered in various scenarios, usually when
installing an package. It indicates that the operation being carried out
could not be completed due to permission issues. This error often indicates that
a write was attempted to a file that is in a read-only state although you may
sometimes encounter an error instead.
Here are some possible fixes you can try if you run into this problem:
- Close all instances of your editor before rerunning the command (maybe some
files were locked by the editor). - Clean the cache with .
- Close or disable your Anti-virus software if have one.
- If you have a development server running, stop it before executing the
installation command once again. - Use the option as in .
- Remove your folder with and install them
once again with .
Disable Protocol Filtering (if applicable)
As it turns out, one popular reason that will ultimately call this issue is some kind of TCP protocol filtering that ultimately ends interrupting the connection between the peer (you) and the server you’re attempting to access.
In most cases, this ends up being caused by an overprotective AV suite that has Protocol Filtering enabled by default. This security feature will end up checking the security of all your browser communications and block any suspicious activity.
This is perfectly fine when it works as advertised. But some AV (most commonly ESET) are known to cause a lot of false positives that will end up preventing users from accessing certain websites.
If you’re using ESET Antivirus as your default 3rd party security suite, follow the instructions below to disable Protocol Filtering:
- Open the main ESET antivirus program.
- Access the Advanced setup manually or by pressing F5.
- Once you are inside the Advanced setup window, start by clicking on Web and Email.
- Next, expand the Protocol Filtering section and click on the associated slider bar next to Enable application protocol content filtering to disable the feature.
- Click Ok to save the changes, then see if the issue has been resolved by trying to access the same website that was previously triggering the error.
NOTE: If you’re using a different AV that is deploying protocol filtering, the steps above will obviously not apply. in this case, search online for specific steps on disable protocol filtering according to the 3rd party AV that you’re using.
If this operation wasn’t applicable or you determined that ESET’s protocol filtering wasn’t causing the PR_CONNECT_RESET_ERROR, move down to the next potential fix below.
Особенности настройки uTorrent
Для того, чтобы проверить правильность настроек клиента и исправить их, необходимо зайти в сами настройки программы (вкладка настройки)
При этом важно оптимизировать настройки лишь тогда, когда uTorrent не в состоянии связаться с пирами. Вот несколько важных моментов настройки ПО uTorrent:
- В общих настройках нужно поставить галочки на нескольких пунктах – «автопроверка ассоциаций», «запускать свернуто» «запрет спящего режима». Иные пункты должны быть без галочек.
- Разрешить программе запускаться вместе с операционной системой. Подойдет этот пункт только тем, у кого достаточно мощный компьютер.
- Обновление – рекомендуется снять галочку с параметра «обновлять до бета-версии», так как именно бета-версии отличаются тем, что не являются достаточно стабильными.
- Ассоциации. Это пункт следует оставить включенным, чтобы программа автоматически, без привлечения пользователя, смогла запускать через себя торрент-файлы и скачивать необходимый контент с интернета.
Эти настройки помогут если не решить проблему с подключением к серверам, то хотя быть сделать установленную версию клиента uTorrent более стабильной и безопасной.
unarc.dll вернул код ошибки 1,6,7,12,14 — что делать и как исправить?!
В качестве причины ошибки значится «failed CRC Check», что как раз и говорит о повреждении архива. Поэтому Вам придется качать пакет заново или искать другой. А вот если причиной ошибки значится «decompression failed», как здесь:
То в этом случае причину надо скорее всего искать на Вашем компьютере и чаще всего она заключается в том что не установлен нужный архиватор ( особенно часто в этом случае в сообщении об ошибке сказано: «unarc dll вернул код ошибки-7»). Понятно, что при инсталляции официальных лицензионных версий пользователь вряд ли столкнется с таким трудностями, так как там не гонятся за уменьшением объема пакета. А вот в случае repack’ов их создатели частенько любят использовать «экзотические» методы архивации (особенно если инсталляция имеет немалый объем), имеющие бОльшую степерь сжатия. Самые часто используемые архиваторы — это:
— RAR с распаковкой через SFX. — 7-zip с его дополнительными алгоритмами bcj2, delta, lzma2, ppmd и большего словаря может обеспечить лучшее сжатие. Распаковка так же через SFX или dll. — FreeArc. Распаковка через SFX или dll. — NanoZIP. Распаковка через SFX.
Помочь при таком раскладе может установка последней версии универсального архиватора 7-zip. Скачать её Вы можете с официального сайта.
В принципе, приведенные выше способы устраняют ошибку isdone.dll и unarc.dll в 90% случаев. Все остальные причины являются частными. Тем не менее, я думаю что их нужно рассмотреть подробно.
1. Наличие кириллических символов в наименовании директории. Проще говоря — папка, в которую Вы устанавливаете игру названа по русски, либо в пути к этой папке присутствуют русские слова или буквы. Поясню на примере:
То есть Вам надо переименовать папку и попробовать снова установить приложение.
2. Маленький файл подкачки.
Ещё одна причина ошибок с unarc.dll — маленький размер или вообще полное отсутствие файла подкачки в Вашей Windows 7 или Windows 8. Это факт может стать критичным при распаковке архива размером в десяток гигабайт. Оперативной памяти начинает не хватать и система активно использует файл подкачки. Но и он не резиновый. Итог — «decompression failed». Чтобы увеличить файл подкачки надо зайти в свойства системы. Сделать это можно через Панель инструментов, либо нажав комбинацию клавиш Win+R и введя команду: sysdm.cpl
Открываем вкладку «Дополнительно» и нажимаем кнопку «Параметры»:
Затем снова вкладка «Дополнительно». В разделе «Виртуальная память» нажимаем кнопку «Изменить». Откроется вот такое окно:
Снимаем галку «Автоматически выбирать объем файла подкачки» и выбираем локальный диск, на котором его разместим. Для этого советуют выбирать любой отличный от системного диск, где есть большой объем свободного места. Затем указываем максимальный размер равный размеру оперативной памяти и кликаем на кнопку «Задать». Слишком уж большим его тоже делать не стоит. Сохраням параметры.
3. Оперативная память.
Совсем редкая, но имеющая место причина — неисправность одного из модулей оперативной памяти. За всю историю у меня такой случай был только раз. Выяснить можно двумя способами. Первый — вытащить все планки памяти, затем включать по одному и пробовать запускать распаковку. Времени это займет немало конечно.
Поэтому оптимальнее пойти вторым путем — проверить планки с помощью специальных программ. Самая популярная — Memtest86+. Правда запустить её не так просто — надо скачать, записать на диск и загрузиться с этого диска. Пользователи Windows 7 и Windows 8 могут воспользоваться встроенным в систему тестом. Для этого нажимаем кнопку Пуск и пишем: «Диагностика проблем оперативной памяти компьютера». Кликаем по найденному значку, откроется окно:
![Исправление ошибки параметр задан неверно на внешнем жёстком диске в windows 10/8/7 [6+ способов] - easeus](https://tiniatov.ru/wp-content/uploads/7/d/a/7daa4318b29891fb38059135d1a156d3.jpeg)


Заключение:
В список перечисленных способов и методов решения я не включил ещё один, к которому тем не менее пробуют прибегнуть некоторые пользователи. Они бороздят просторы сети и пытаются скачать файл библиотеки ISDone.dll или unarc.dll и установить их в системную папку. Этот способ не работает. Более того, я даже в Интернете не нашел ни одного реального случая чтобы это помогло. Максимум, чего удается добиться — это сменить код ошибки ( как правило вместо кода -7 появляется код -1). Если вышеуказанные варианты результата не принесли — Вам остается только пробовать переустанавливать Windows.
schel4koff.ru
Среди многочисленных системных ошибок, возникающих на компьютерных устройствах, может появиться и ошибка «Runtime Error!», ввергающая многих пользователей в недоумение. На самом деле, данная ошибка появляется не спонтанно, а является результатом каких-то действий пользователя.
Чаще всего причиной ее появления является некорректное обновление установленных на компьютере приложений. Допустим, при желании установить свежую версию какой-то программы, вы просто скачиваете ее из сети, а затем устанавливаете на свое устройство. В этот момент и происходит сбой в параметрах реестра, ведь старая версия еще не удалена.
Такая несостыковка и приводит к появлению данной ошибки. К счастью, не все приложения требуют удаления старых версий при установке обновленных вариантов.
В большинстве случаев пользователь успешно запускает на ПК две или даже больше версий программы. Однако существует целый список программ, способных спровоцировать появление такой проблемы.
Еще одной из причин выхода на экран монитора ошибки Runtime Error является вмешательство в системный реестр со стороны вирусов, шпионских модулей и даже некоторых вполне безобидных приложений.
Будучи установленными на компьютер, они часто подменяют системные файлы своими аналогами, которые решают свои, сугубо личные задачи, не заботясь о функционировании всей ОС. Результат — появление ошибки.
Как избавиться от ошибки «Runtime Error!»
Радикальным методом является переустановка системы, но такой способ использовать не рекомендуется, ведь вы можете потерять какие-то данные, настройки, да и времени уйдет порядочно. Гораздо проще устранить ошибку каким-то другим способом, менее трудоемким. Ниже будут перечислены варианты устранения ошибки.
Вам нужно будет выбрать один из них, который вам подойдет. Остальные способы могут просто не сработать. Так что, стоит выполнить их последовательно, пока ошибка не исчезнет.
Выполните антивирусное сканирование всех дисков. Наверняка вы обнаружите там несколько вредоносных модулей.
Произведите чистку системы от мусора одной из программ-чистильщиков. Например, System Cleaner, Advanced SystemCare, CCleaner.
Установите последние версии таких продуктов, как Visual C++ (Visual C++2010), Net.Framework и DirectX. Поврежденные файлы именно этих приложений часто приводят к появлению ошибки.
Используйте режим совместимости программ. Для его включения установите соответственный флажок во вкладке «Совместимость», находящейся в свойствах ярлыка данной программы. Попробуйте запустить программу, используя ее совместимость с разными ОС.
Выполните откат системы до того момента, когда ошибки еще не было. Для этого должно быть включена функция восстановления системы. При этом вы не сможете использовать приложения, установленные после этой даты, но и ошибка зачастую исчезает вместе с этими приложениями.
Если ошибка «Runtime Error!» остается, то единственным выходом будет переустановка системы. Обязательно отформатируйте раздел, на который система будет ставиться.
Вы можете посмотреть так же записи
Не включается компьютер: диагностика
Защищаем компьютер без антивирусных программ
Оптимизация работы Windows 8
Основы работы в Adobe Photoshop
Как удалить троян вымогатель
Как подключить ноутбук к телевизору: 3 важных шага
Как проверить работу Windows 10 не удаляя любимую операционную систему
Как защитить информацию в телефоне
Как установить фотографию на контакт в андроид
Какая операционная система лучше для смартфона
Как внести номер в черный список на андроид
Как восстановить удалённые данные на андроиде
Uninstall 3rd party firewall (if applicable)
If you were to break down the error code piece by piece, you’ll realize that it’s really signalling an interruption between the end-user and the server. In the vast majority of cases, this problem is facilitated by an overprotective firewall that ends up interrupting the connection due to a false positive.
If you’re certain that the website you’re trying to visit is legitimate and you’re using a 3rd party firewall instead of the default Windows firewall, you should investigate to see if the external tool is not actually creating the problem.
Keep in mind that contrary to the behaviour of an AV suite, disabling the real-time protection of a firewall will not stop this behaviour from occurring. Chances are the same security rules will remain in place.
The only way to thoroughly make sure that your third party firewall suite has nothing to do with the issue is to temporarily uninstall it. Here’s a quick guide on making this possible:
- Open up a Run dialogue box by pressing Windows key + R. Next, type ‘appwiz.cpl’ and press Enter to open up the Programs and Features window.
- After you manage to get inside the Programs and Features screen, move down through the list of installed applications and locate the 3rd party suite that you are currently using. Once you manage to locate it, right-click on it with your mouse and choose Uninstall from the next context menu.
- Once you manage to get inside the uninstallation menu, follow the on-screen instructions to complete the uninstallation process.
- After the process is complete, you can also follow the instructions (here) to ensure that you’re not leaving behind any leftover files that might still cause the same behaviour.
- As soon as the operation is complete, restart your computer and see if the issue is resolved at the next system startup.
If this scenario wasn’t applicable or you’re still encountering this problem even after following the instructions above, move down to the next potential fix.
Видео
Cisco anyconnect vpn installation issue on Windows 7
![]()
Installation Ended Prematurely Because of an Error In Windows 10/8/7
![]()
Cisco Anyconnect Installation failed with prematurely error
![]()
How to Fix the Error: Installation ended prematurely because of an error
![]()
How To Fix Installation Ended Prematurely Because Of An Error Windows 10/8/7
![]()
How to Fix Installation Ended Prematurely Because of an Error
![]()
Installation Ended Prematurely Because of an Error fix
![]()
Installation Fails: Installation Ended Prematurely Because of an Error In Windows 10/8/7
![]()
Cisco AnyConnect Secure Mobility Client service can not start on Windows 7 64 bit system
![]()
How to Fix Installation: Error Installation ended prematurely because of an error
![]()
Problems with installing the Cisco Anyconnect Client version 4.1.04011-web-deploy-k9 on Windows 10
I am having problems with installing the Cisco Anyconnect Client version 4.1.04011-web-deploy-k9 on Windows 10.


![Самые легкие способы исправить ошибку [runtime error]](https://tiniatov.ru/wp-content/uploads/d/e/d/ded8b6b2911fd6eb1a3dec5af6f76942.jpeg)
Before upgrading to Windows 10 I uninstalled (add / remove programs) the old client.
After upgrade to Windows 10 I want to install the supported version of Anyconnect but this failed. I receive the error:
«The feature you are trying to use is on a network resource that is unavailable.»
«Click OK to try again or enter an alternate path to a folder containing the installation package «Winsetup-Release-web-deploy.mis» in the box below.»
I am running the installation as Administrator, the installation file is on my local C: drive.
I guess that the removal of the old version was incomplete and that the new installation is trying to remove files and/or registry settings but is missing an uninstallation file.
Event 11714: The older version of Cisco AnyConnect Secure Mobility Client cannot be removed.
On the internet I found related topics with the solution to use the Microsoft fix tool. This tool isn’t available for Windows 10.
Is there a new fix tool for this or is there an instruction to manual remove all old files and registry settings?
It’s the server’s problem
An internal server error is an error on the web server you’re trying to access. That server is misconfigured in some way that prevents it from responding properly to what you’re asking it to do.
Think of it like the web’s version of a blue screen. ![]() Something went so wrong on the server that it couldn’t even tell you what the problem was.
Something went so wrong on the server that it couldn’t even tell you what the problem was.
The person who is responsible for the website needs to fix it.
It’s still the server’s fault, but…
Even though it’s the server’s fault for not handling something properly, there are scenarios where you might have inadvertently caused this. For example, errors in URLs can cause it.
Similarly, if you’re typing in a URL from a book or other source, and don’t type it in exactly, you might see this message.
To be clear, the server should be able to handle whatever you did cleanly and report errors in some useful way. If the server doesn’t, and you get an Internal Server Error message, it’s still the server’s fault.
There are some straws to grasp at
An internal server error happens when the server encounters a situation it doesn’t know how to handle. Occasionally, your browser can be the source of these kinds of errors. You can try these steps to see if they’ll help:
- Clear the browser cache
- Clear cookies
- Refresh the page (F5)
- Try a different browser
While it’s more than likely these won’t work, there’s always a chance they might, and they are simple to try.
If you’re the webmaster…
What if you’re the webmaster?
Nine times out of 10, this error results from one of two common errors:
- An error in a CGI script caused it to fail or output an error message before it started producing valid HTML. It happens to me all the time if I have a syntax error in one of my Perl CGI scripts.
- A permissions issue occurred when attempting to access a CGI script. Depending on how your web server is configured, it’s not enough for the script to have “execute” permission; it must also be owned by the correct user and belong to the correct group. I can’t tell you what that should be, because it varies widely from server to server (and even from site to site on the same server). My best recommendation is to look at the attributes of a script that is working and copy that.
The format of the error described here is common for Apache web servers. That means we can also look for common error logs. Once again, the location of these logs varies a great deal based on specific web server configuration.
- access_log is the log of successful accesses. On a shared or virtual hosting server, there may be many of these: one per website, often with site-specific names or in site-specific locations on the server.
- error_log is the log of errors. On some hosts, there is an error log per site. On others, each site has its own access_log, but there may only be a single error_log for the system.
- suexec_log is the log most people forget. It deals with the permissions used to execute CGI and other scripts. When a CGI fails to execute because its ownership is wrong, the generic internal server error shows in the error log, but a more specific error detailing the permissions involved appears in this log.
Additionally?
The message “Additionally, a 500 Internal Server Error was encountered while trying to use an ErrorDocument…” indicates a second configuration error on the server.
When the web server encounters an error of any sort, the page it displays to report the error is just another .html file stored on the server. This error means that trying to display the error page for the first error (the internal server error) actually generated a second error (also an internal server error, in your case).
At that point, the server just gave up.
Do this
Subscribe to Confident Computing! Less frustration and more confidence, solutions, answers, and tips in your inbox every week.
I’ll see you there!